Group Policy - Tutorials and Tips: Sub
Creative Commons - BY
This electronic book was generated by Anthologize
One of the new feature of Group Policy Preferences in Windows 7 and Windows Server 2008 R2 is support for configuring power plans using preferences for Windows Vista and later (see Image 1). You used to be able to control power management in Vista using native policies however the advanced targeting of preferences now enables lot of new scenarios with power savings. AWSOME!
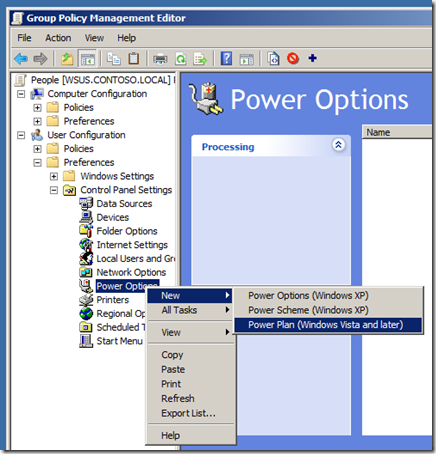
Image 1. Creating a new Windows Vista and Later Power Plan
One of the really neat things that you can do with Group Policy Preferences (GPPâs) and Targeting is change the power scheme of a computer based on the time of the day and the day of the week. This allows you to apply more aggressive power plans to your workstations after hours but then then back off during the day when people are working. Even though that Windows Vista (and Windows 7) support adaptive display time out which backs off the screen saver timeout when a user is still sitting at a computer but not actively using it they still have to wake up the computer by before the timeout started to back off. Applying the less aggressive power plan during working hours means that the user is less likely to have to keep waking up their computer in the first place as you have configured longer time out values.
Now if this sounds familiar youâd be right as I did demo some of this during my TechEd Australia Group Policies session that I did with Lilia Gutnik and it is similar to the TechNet Edge video by Michael Kleef and Mark Gray. But in this article I am going to diving a lot deeper than my demo or in the TechNet Edge video.
So before we talk about how to do this first lets go over what we are trying to achieve. We are assuming you manage a fleet of workstations that are only used during standard business hours and afterhours you want the computers to go to use as little as power as possible. You want to apply different power plans to the computers not only based on the day of the week but also the time of the day to make sure you get maximum possible power savings (see Image 2).
Image 2. Example power plan timetable
So to do this we setup two separate power plans, with one that is applied by default all the time and the other one that will take precedence and apply during business hours.
How to setup the Default Power Plan Policy
Step 1. Create a Power Plan under the User Configuration option of a GPO that has has aggressive power savings configured without any targeting other than being applied to all the users you want to control the power plans. I will leave the exact details of the power plan up to you but I will recommend that if you are going to set the âSleepâ timeout for Windows Vista (or greater) then make sure you also enable the âAllow hybrid sleepâ option (even on your desktops) (see Image 3.) as this will protect your computers from data loss if you lose power to your office environment afterhours.
Image 3. Enable hybrid sleep mode
Step 2. Rename the item to be called something like âDefault Power Planâ (see Image 4) and also make sure that it is always set to order number one.
WARNING â If you do this make sure you either immediately disable the item (tool bar > red circle âdisable this itemâ) or setup the Business Hours Power Plan straight away so that you don't start shutting down all your computer during the middle of the day.
Image 4. Default Power Plan at Order 1
How to setup the Business Hours Power Plan Policy
Step 3. Create another Power Plan setting item called âBusiness Hours Power Planâ (see Image 5.) making sure it is lower order than the default power plan. Again I will leave the exact settings up to you but this one should be less aggressive than your default power plan.
Image 5. Business Hours Power Plan
Step 4. Now go into the properties of the âBusiness Hours Power Planâ
Step 5. Click on the Common Tab and tick âItem-Level Targetingâ
Step 6. Click on the targeting button
First of all we are going to create a collection that will target the Business House Power Plan to only the weekdays of the week.
Step 7. In the targeting Editor click on âAdd Collectionâ (see Image 6.)
Image 6. Creating a targeting collection
Step 8. Click on the âNew Itemâ and then click on âDate Matchâ (see Image 7 & 8.)
Image 7. Creating a Date Match rule
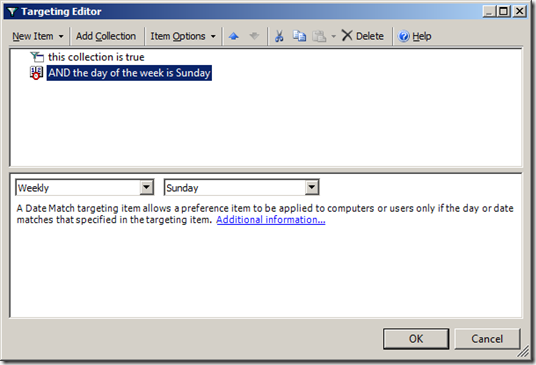
Image 8. Date match rule before being dragged into a Collection
Step 9. Now you will need to drag the âAND the day of the week is Sundayâ onto the âthe collection is trueâ and change the day to âMondayâ (see Image 9.)
Image 9. Date Match rule after being dragged in the collection.
Step 10. Now make sure that âthe day of the week is Mondayâ is highlighted and click CTRL-C once and CTRL-V four times to copy and paste the date match rule once for each weekday (see Image 10).
Image 10. Five date match rules in one collection
Step 11. Now click on each of the âAND the day of the week is Mondayâ and press F6 to change each date match rule from and âANDâ to a âORâ and then change the days to Tuesday , Wednesday, Thursday and Friday (see Image 11).
Image 11. Data Range Collection configured to apply only during weekdays
Now we will add a Time Range option that will refine when we target the Business House Power Plan to just working hours of the weekdays.
Step 12. Click on the âthis collection is trueâ and then click on âNew Itemâ and then click on âTime Rangeâ (see Image 12).
Image 12. Adding Time Range to targeting
Step 13. Now configured the time range to when during the day you want to Business Hours Power Plan to apply (see Image 13).
Note - Make sure you allow for the policy refresh interval (default 90 minutes with a 20% random offset) when configuring the start and end time. This means you might want to start applying the policy 2 hours before the start of business (e.g. 6:30am) to make sure all the computers are configured with the Business Hours Power Plan before people login in the morning (e.g. 8:30am).
Image 13. Targeting configured with Date Range collection and a Time Range
Now you have configured a Group Policy Preference to apply less aggressive power plans to your computer during business hours while still having more aggressive power plans applied after hours.
Other Option - More user Control
In the example above we just modified the âBalancedâ power plan setting when we wanted to make changes to the power settings. If you did not want to give your users some more control and not force specific power plans you could just select the âHigh performanceâ plan and tick âSet as the active power planâ for the Business Hours Power Plan (see Image 14) and the âPower Saverâ plan as active in the Default Power plan (see Image 15).
Image 14. Setting the High Performance plan as active
Image 15. Setting the Power Saver plan as active
This way your users can still configure each of the power plans to their own preference but you will still make sure that the âPower Saverâ plan will be applied to your computers after hours. However as you are only setting which plan is active then your users could get around the power plan as by configure both plans to never time out thus negating the benefit of any of the planâs.
Other Options â Less aggressive Default Power Plan
You may also want to set the default power policy to be less aggressive by default and then apply the aggressive power as the second item in the list using a little more complicated targeting (see Image 16). The advantage of this method is you can easily turn off the aggressive power savings plan when you want to do afterhours by just disabling the âAfterhours Power Planâ.
Image 16. Targeting to apply plan only afterhours
Recently, I have been working a lot with PowerShell to automate the creation of a full AD site OU structure (with Group Policy and all) along with all the necessary delegated permissions. One of the limitation of the out of the box AD PowerShell commands is there is no easy way (but apparently there is a really hard way) to delegate permission to Active Directory OUâs. Luckily Quest Software have helped a lot here and they have offered a set of FREE PowerShell commands for Active Directory called âActiveRoles Management Shell for Active Directoryâ one of which is called Add-QADPermission which greatly simplifies the process of delegation security in AD.
The Add-QADPermission command can be used to add an DACL security descriptor permission to any AD object with a distinguished name such as users, computer or OUâs. Therefore you can use this to delegate permission to OU similarly to running a âDelegation of Control Wizardâ in Active Directory Users and Computers console (see image below).
This wizard allows you to delegate some common tasks (see below) to your OUâs in you Active Directory however the permissions they apply are not straight forward simple permissions.
What I will show you how to do is how to perform some of the common delegation tasks that the âDelegation of Control Wizardâ using a PowerShell command so you can automate the process for creating new OUâs in your environment. I know this is not strictly an Group Policy topic but it is one closely related and one I think many Group Policy admins will find useful.
The Command tasks I will show you are the oneâs that I almost exclusively use when delegating permissions to Active Directory, they are:
The Add-QADPermission command is a third party PowerShell command so you will need to first download and install the new commands from the Quest site on the computer that you will be running the PowerShell commands. You can download the Quest ActiveRoles Management Shell for Active Directory from here http://www.quest.com/PowerShell/activeroles-server.aspx and then install the MSI file.
Step 1. After launching the MSI click âNextâ
Step 2. Tick âI accept the terms in the Licence Agreementâ and click âNextâ
Step 2. 3lick âNextâ
Step 4. Click âNextâ
Note: By ticking the âChange PowerShell execution policy from âRestrictedâ to âAllSignedâ you are relaxing the execution policy of PowerShell. However you will still need to turn this off entirely for the testing of your script.
Step 5. Click âInstallâ
Step 6. Click âFinishâ
You have now successfully install the Quest ActiveRoles Management Shell for Active Directory. Now it is time to use the new PowerShell Command.
Step 1. To run the add-QADPermissions PowerShell command click on the PowerShell shortcut (that blue one in the taskbar if you are running 2008/R2).
Step 2. Run the command the following command to load the Quest PowerShell commands.
Add-PSSnapin Quest.ActiveRoles.ADManagement
Step 3. To test that the new PSSnapin is loaded type âadd-qadperâ and then press the âTabâ key to complete the command.
This should auto-complete the command to âAdd-QADPermissionâ
REMEMBER: Every time you launch a new PowerShell window you are going to need to run âAdd-PSSnapin Quest.ActiveRoles.ADManagementâ to load to load the Quest PowerShell Snapinâs otherwise you will see a message like the image below.
Now that we have verified that the new Quest AD PowerShell commands lets take a look at the command that will replicate some of the common tasks in the âDelegation of Control Wizardâ. In our example environment that we have an AD with three top level OUâs called âPeopleâ âGroupsâ and âWorkstationsâ (see below). These OU only contain the same type of objects that match the name of the OU (e.g. âPeopleâ contains User AD Objects) but it is possible to delegate all the permissions to the same single OU if it contains objects of multiple types (e.g. user,computers and groups).
To delegate the same permission as the âCreate, delete, and mange user accountsâ (effectively Full Control) option in the âDelegation of Control Wizardâ (see below) you need to delegate two permissions to the OU.
The first command will delegate Allow access to all the properties to the group called âUser Adminsâ to all User objects in the OU with the distinguished name of âOU=People,DC=Contoso,DC=Localâ.
Add-QADPermission âOU=People,DC=Contoso,DC=Localâ âAccount âCONTOSOUser Adminsâ -Rights GenericAll -ApplyTo ChildObjects -ApplyToType User
The second command will delegate Create / Delete permission for the User objects to the same OU for the same group.
Add-QADPermission âOU=People,DC=Contoso,DC=Localâ -Account âCONTOSOUser Adminsâ -Rights CreateChild,DeleteChild -ApplyTo All -ChildType User
Now we can check the security on the People OU in Active Directory Users and Computer to verify the permission has been added correctly.
Note: See how we have used the â-ApplyTo ChildObjectsâ parameter and the âApplyTo Allâ to ensure that these permission will inherit to all objects in this OU and sub-OUâs.
If the OU that you want to give the same Full Control permission to a Computers or Groups AD Object type all you need to do is change the -ApplyToType and -ChildType parameter to âcomputerâ or âgroupâ (See examples below)
Add-QADPermission âOU=Workstations,DC=Contoso,DC=Localâ âAccount âCONTOSOWorkstations Adminsâ -Rights GenericAll -ApplyTo ChildObjects -ApplyToType Computer
Add-QADPermission âOU=Workstations,DC=Contoso,DC=Localâ -Account âCONTOSOWorkstations Adminsâ -Rights CreateChild,DeleteChild -ApplyTo All -ChildType Computer
Add-QADPermission âOU=Groups,DC=Contoso,DC=Localâ âAccount âCONTOSOGroups Adminsâ -Rights GenericAll -ApplyTo ChildObjects -ApplyToType Group
Add-QADPermission âOU=Groups,DC=Contoso,DC=Localâ -Account âCONTOSOGroups Adminsâ -Rights CreateChild,DeleteChild -ApplyTo All -ChildType Group
To delegate the same permission as the âReset user passwords and force password change at next logonâ option in the âDelegation of Control Wizardâ (see below) you again need to delegate two permissions to the OU.
In this example we are going to delegate Allow Read and Write permission to the Pwd-Last-Set Attribute to all User objects to the OU with the distinguished name of âOU=People,DC=Contoso,DC=Localâ to the group called âUser Operatorsâ.
Add-QADPermission âOU=People,DC=Contoso,DC=Localâ -Account âCONTOSOUser Operatorsâ -Rights ReadProperty,WriteProperty -Property ('PwdLastSet') -ApplyTo ChildObjects -ApplyToType User
Now we are going to delegate permissions to the Extended Right User-Change-Password for the User objects to the same OU for the same group.
Add-QADPermission âOU=People,DC=Contoso,DC=Localâ -Account âCONTOSOUser Operatorsâ -ExtendedRight User-Change-Password -ApplyTo ChildObjects -ApplyToType User
Again check the security on the People OU in Active Directory Users and Computer to verify the permission has been added correctly.
To delegate the same permission as the âModify the membership of a groupâ option in the âDelegation of Control Wizardâ (see below) you only need to apply one command to delegate the appropriate permissions.
In this example we are going to delegate Change group membership permissions on all the Group objects to the OU with the distinguished name of âOU=Groups,DC=Contoso,DC=Localâ to the group called âGroup Operatorsâ
Add-QADPermission âOU=Groups,DC=Contoso,DC=Localâ -Account âCONTOSOGroup Operatorsâ -Rights ReadProperty,WriteProperty -Property ('member') -ApplyTo ChildObjects -ApplyToType Group
As always check the security on the People OU in Active Directory Users and Computer to verify the permission has been added correctly.
When used with the other out of the box AD PowerShell commands you should now be able to fully automate the creation AND delegation of permissions to a new OU structure for your environment.
Below are some useful links to pages that show you how to use PowerShell when working with Active Directory.
Other AD Security Related Pages
Update: I have since reposted this article with new registry keys that makes configured Adobe updater a lot easer. Check it out at  http://www.grouppolicy.biz/2010/06/updated-how-to-make-adobe-reader-more-secure-using-group-policy/
Recently there have been a number of critical security issues that have been associated with Adobe Reader (see below).
To see a complete list of current updates for Adobe Reader (all current versions) on Windows go to http://www.adobe.com/support/downloads/product.jsp?product=10&platform=Windows
This has has left IT administrators with a bit of a nightmare as to how to keep Reader secure as Adobe donât have the wonderful tools such as Group Policy and Windows Update, WSUS and SCCM to manage their patch rollout deployment.
One thing you might notice about the many of the vulnerabilities in Adobe products is that they are frequently JavaScript issues. Surprisingly the recommend action from Adobe to mitigate this security issues is to simply turn off JavaScript (which is enabled by default) in Adobe Reader. Seeing how rarely the JavaScript option is actually used in Adobe Reader I recommend that you just configure this option to be permanently turned off (see image 1).
Image 1. Adobe Reader JavaScript option
Now there is no way to disable the user interface you can disable the user interface using third-party tools (see http://www.policypak.com/support-and-sharing/video-tutorials) to prevent users to re-enabling this option. However some users might need to open PDFâs with JavaScript content so leaving the UI enabled would allow them to re-enable the option when needed. The good thing about configuring this registry key via Group Policy Preferences is that it would automatically turn the option off in the background at the next policy update leaving JavaScript only enabled for a few hours. NICE!
To do disable this option edit a Group Policy Object (GPO) that is targeted to the users accounts. Once you have opened the GPO in the Group Policy Management Editor go to User Configuration > Preferences > Windows Settings > Registry then go to Action > All Tasks > Add and configured a New Registry setting (as per image below).
Image 2. Disable JavaScript registry key
The key to update is:
Key: HKCUSoftwareAdobeAcrobat Reader9.0JSPrefs
Value: bEnableJS (REG_DWORD)
Data: 0 (zero)
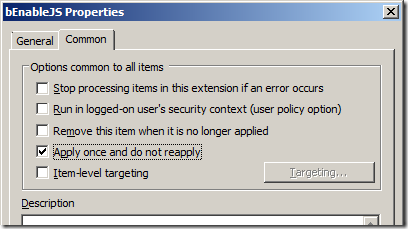
Note: If you donât want this option to be turned off once a users has re-enabled it then tick the âApply once and do not reapplyâ option in the âCommonâ tab (see image 3) as this will only change this registry key once making it more a default setting rather then an enforced one.
Image 3. Apply one and do not reapply
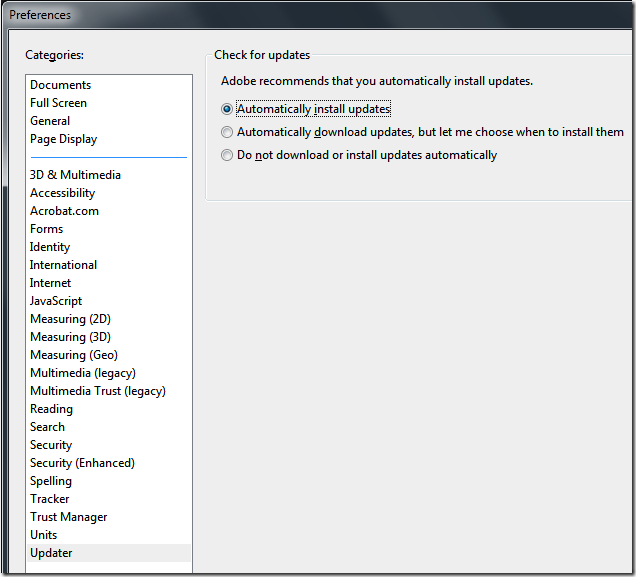
Adobe has also added a âAutomatically install updatesâ feature (see image 4) with the release of Adobe Reader 9.2.0. however as of the time of writing this document the new version of Adobe Reader 9.3.0 is out and for some reason it is not automatically updating. So maybe there is a little more work to go here for Adobe.
Image 4. Adobe Reader Updater Preferences
If you do want to experiment with configuring this option via group policy then you need to run the following command on the computer in the context of the system account.
âC:Program FilesCommon FilesAdobeARM1.0ReaderUpdater.exeâ /ArmPrefs /MODE:3
Note: You need to use âProgram Files (x86)â if you are running 64bit version of Windows.
You can do this my using the âNew Immediate Taskâ option under Computer Configuration > Preferences > Control Panel Settings > Scheduled Tasks in the Group Policy Management Editor.
Â
So good luck with trying securing Adobe Reader in your organisation as its certainly a front that IT administrator need to focus more upon as McAfee labs have said âAdobe product exploitation will likely surpass that of Microsoft Office applications in 2010.â.
Recently, I have been working a lot with PowerShell to automate the creation of a full AD site OU structure (with Group Policy and all) along with all the necessary delegated permissions. One of the limitation of the out of the box AD PowerShell commands is there is no easy way (but apparently there is a really hard way) to delegate permission to Active Directory OUâs. Luckily Quest Software have helped a lot here and they have offered a set of FREE PowerShell commands for Active Directory called âActiveRoles Management Shell for Active Directoryâ one of which is called Add-QADPermission which greatly simplifies the process of delegation security in AD.
The Add-QADPermission command can be used to add an DACL security descriptor permission to any AD object with a distinguished name such as users, computer or OUâs. Therefore you can use this to delegate permission to OU similarly to running a âDelegation of Control Wizardâ in Active Directory Users and Computers console (see image below).
This wizard allows you to delegate some common tasks (see below) to your OUâs in you Active Directory however the permissions they apply are not straight forward simple permissions.
What I will show you how to do is how to perform some of the common delegation tasks that the âDelegation of Control Wizardâ using a PowerShell command so you can automate the process for creating new OUâs in your environment. I know this is not strictly an Group Policy topic but it is one closely related and one I think many Group Policy admins will find useful.
The Command tasks I will show you are the oneâs that I almost exclusively use when delegating permissions to Active Directory, they are:
The Add-QADPermission command is a third party PowerShell command so you will need to first download and install the new commands from the Quest site on the computer that you will be running the PowerShell commands. You can download the Quest ActiveRoles Management Shell for Active Directory from here http://www.quest.com/PowerShell/activeroles-server.aspx and then install the MSI file.
Step 1. After launching the MSI click âNextâ
Step 2. Tick âI accept the terms in the Licence Agreementâ and click âNextâ
Step 2. 3lick âNextâ
Step 4. Click âNextâ
Note: By ticking the âChange PowerShell execution policy from âRestrictedâ to âAllSignedâ you are relaxing the execution policy of PowerShell. However you will still need to turn this off entirely for the testing of your script.
Step 5. Click âInstallâ
Step 6. Click âFinishâ
You have now successfully install the Quest ActiveRoles Management Shell for Active Directory. Now it is time to use the new PowerShell Command.
Step 1. To run the add-QADPermissions PowerShell command click on the PowerShell shortcut (that blue one in the taskbar if you are running 2008/R2).
Step 2. Run the command the following command to load the Quest PowerShell commands.
Add-PSSnapin Quest.ActiveRoles.ADManagement
Step 3. To test that the new PSSnapin is loaded type âadd-qadperâ and then press the âTabâ key to complete the command.
This should auto-complete the command to âAdd-QADPermissionâ
REMEMBER: Every time you launch a new PowerShell window you are going to need to run âAdd-PSSnapin Quest.ActiveRoles.ADManagementâ to load to load the Quest PowerShell Snapinâs otherwise you will see a message like the image below.
Now that we have verified that the new Quest AD PowerShell commands lets take a look at the command that will replicate some of the common tasks in the âDelegation of Control Wizardâ. In our example environment that we have an AD with three top level OUâs called âPeopleâ âGroupsâ and âWorkstationsâ (see below). These OU only contain the same type of objects that match the name of the OU (e.g. âPeopleâ contains User AD Objects) but it is possible to delegate all the permissions to the same single OU if it contains objects of multiple types (e.g. user,computers and groups).
To delegate the same permission as the âCreate, delete, and mange user accountsâ (effectively Full Control) option in the âDelegation of Control Wizardâ (see below) you need to delegate two permissions to the OU.
The first command will delegate Allow access to all the properties to the group called âUser Adminsâ to all User objects in the OU with the distinguished name of âOU=People,DC=Contoso,DC=Localâ.
Add-QADPermission âOU=People,DC=Contoso,DC=Localâ âAccount âCONTOSOUser Adminsâ -Rights GenericAll -ApplyTo ChildObjects -ApplyToType User
The second command will delegate Create / Delete permission for the User objects to the same OU for the same group.
Add-QADPermission âOU=People,DC=Contoso,DC=Localâ -Account âCONTOSOUser Adminsâ -Rights CreateChild,DeleteChild -ApplyTo All -ChildType User
Now we can check the security on the People OU in Active Directory Users and Computer to verify the permission has been added correctly.
Note: See how we have used the â-ApplyTo ChildObjectsâ parameter and the âApplyTo Allâ to ensure that these permission will inherit to all objects in this OU and sub-OUâs.
If the OU that you want to give the same Full Control permission to a Computers or Groups AD Object type all you need to do is change the -ApplyToType and -ChildType parameter to âcomputerâ or âgroupâ (See examples below)
Add-QADPermission âOU=Workstations,DC=Contoso,DC=Localâ âAccount âCONTOSOWorkstations Adminsâ -Rights GenericAll -ApplyTo ChildObjects -ApplyToType Computer
Add-QADPermission âOU=Workstations,DC=Contoso,DC=Localâ -Account âCONTOSOWorkstations Adminsâ -Rights CreateChild,DeleteChild -ApplyTo All -ChildType Computer
Add-QADPermission âOU=Groups,DC=Contoso,DC=Localâ âAccount âCONTOSOGroups Adminsâ -Rights GenericAll -ApplyTo ChildObjects -ApplyToType Group
Add-QADPermission âOU=Groups,DC=Contoso,DC=Localâ -Account âCONTOSOGroups Adminsâ -Rights CreateChild,DeleteChild -ApplyTo All -ChildType Group
To delegate the same permission as the âReset user passwords and force password change at next logonâ option in the âDelegation of Control Wizardâ (see below) you again need to delegate two permissions to the OU.
In this example we are going to delegate Allow Read and Write permission to the Pwd-Last-Set Attribute to all User objects to the OU with the distinguished name of âOU=People,DC=Contoso,DC=Localâ to the group called âUser Operatorsâ.
Add-QADPermission âOU=People,DC=Contoso,DC=Localâ -Account âCONTOSOUser Operatorsâ -Rights ReadProperty,WriteProperty -Property ('PwdLastSet') -ApplyTo ChildObjects -ApplyToType User
Now we are going to delegate permissions to the Extended Right User-Change-Password for the User objects to the same OU for the same group.
Add-QADPermission âOU=People,DC=Contoso,DC=Localâ -Account âCONTOSOUser Operatorsâ -ExtendedRight User-Change-Password -ApplyTo ChildObjects -ApplyToType User
Again check the security on the People OU in Active Directory Users and Computer to verify the permission has been added correctly.
To delegate the same permission as the âModify the membership of a groupâ option in the âDelegation of Control Wizardâ (see below) you only need to apply one command to delegate the appropriate permissions.
In this example we are going to delegate Change group membership permissions on all the Group objects to the OU with the distinguished name of âOU=Groups,DC=Contoso,DC=Localâ to the group called âGroup Operatorsâ
Add-QADPermission âOU=Groups,DC=Contoso,DC=Localâ -Account âCONTOSOGroup Operatorsâ -Rights ReadProperty,WriteProperty -Property ('member') -ApplyTo ChildObjects -ApplyToType Group
As always check the security on the People OU in Active Directory Users and Computer to verify the permission has been added correctly.
When used with the other out of the box AD PowerShell commands you should now be able to fully automate the creation AND delegation of permissions to a new OU structure for your environment.
Below are some useful links to pages that show you how to use PowerShell when working with Active Directory.
Other AD Security Related Pages
In this series of post I will show you how to install and user Advanced Group Policy Management (AGPM) v4 tool which part of the Microsoft Desktop Optimisation Pack (MDOP). You qualify to use AGPM (and all the MDOP) tools if you have a subscription advantage (SA) licence agreement with Microsoft. The whole suite of MDOP tools are very handy for any organisation wanting to streamline the management of their desktop SOE fleet. It is my intention that once you have read all these post your should be familiar enough specifically with AGPM to install and use it in your environment.
Both for your convenience and improved load times I have broken this article into itâs separate sections. You can jump to each section you want by simply clicking on the linkâs below or you can just click on the link at the both of each posting to go to the next article in the series:
Advanced Group Policy Management (AGPM) allows organisation to implement change control and versioning to their Active Directory Group Policies. This allows multiple people to edit Group Policy Object (GPO) with their changes going live the instant the change is made. Any changes to a GPO needs to be check-in, deployed then approved before ever making it to production. This product effectively sits between Active Directory (AD) and Group Policy Administrator so that they never directly need to modify a GPO. To prevent circumventing AGPM a proper implementation should include the removal of all edit/modify permission from all GPOâs for everyone except say the service account and the built-in Administrator domain account.
We will now go through a scenario where an administrator (called Alan) will install the AGPM Client and Server. Alan will then delegate another administrator John Reviewer/Editor access in AGPM. John will then create a new Managed GPO and make a change to it and then deploy it for use in production. Alan will then review the GPO and Approve the change. Then Alan will also convert an existing unmanaged GPO to "managedâ status so it can be controlled via AGPM.
NEXT > How to install the Advanced Group Policy Management Client v4
This post is part of a series of posts about Advanced Group Policy Management. If you want to see the other post in this series you can use the links below:
It is best you install the Microsoft Advance Group Policy Management Client on any computer in your organisation that has the the Group Policy Management Console (GPMC) installed. This ensures that all changes to group policy are properly managed using the Advanced Group Policy Management program.
Step 1. Start the Advanced Group Policy Management install program and run the ââ Client install.â option.
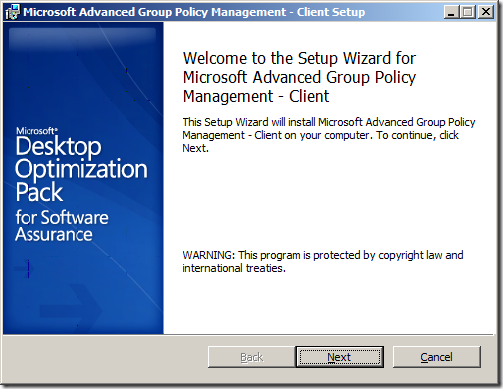
Step 2. At Welcome dialog box, click Next.
Step 3. Tick I accept the license terms and click Next
Step 4. Confirm the install patch and click Next
Step 5. Type the IP or DNS Name of the AGPM server and click Next
Step 6. Leave all the languages selected and click Next
Step 7. Click Install
Step 7a. Optional â Click on the Details button to see the components that will be installed.
Wait
Step 8. Click Finish to exit the Setup Wizard.
NEXT > How to configure the AGPM client via Group Policy to automatically connect to the AGPM server
This post is part of a series of posts about Advanced Group Policy Management. If you want to see the other post in this series you can use the links below:
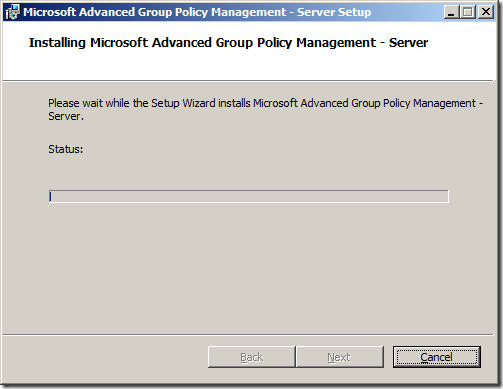
The Advanced Group Policy Management Server is the central server that keeps track and makes changes to all the Group Policy Objects in the forest.Â
Step 1. Start the Advanced Group Policy Management and select the ââ Server install.â option.
Step 2. Click Next
Step 3. Tick I accept license terms and then click Next
Step 4. Confirm the Application path and click Next
Â
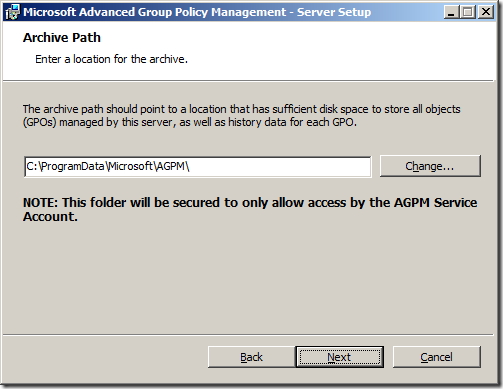
Step 6. Confirm the Archive Path and click Next
Â
Step 7. Enter the AGPM Service Account details. This account needs to have full access to all GPO that you want to manage using AGPM then click Next
Â
Step 8. Enter the Archive Owner account (e.g. ContosoAlan ) this account is the first Full Control administrator in AGPM that is used to delegate permission to other users then click Next
Â
Step 9. Confirm the Port (this needs to be the same as step 5 in the Install Client stage) and click Next
Â
Step 10. Leave all the languages selected and click Next
Â
Step 11. Click Install
Â
Step 11a. Optional â Click on the Details button to see the components that will be installed.
Â
Wait
Â
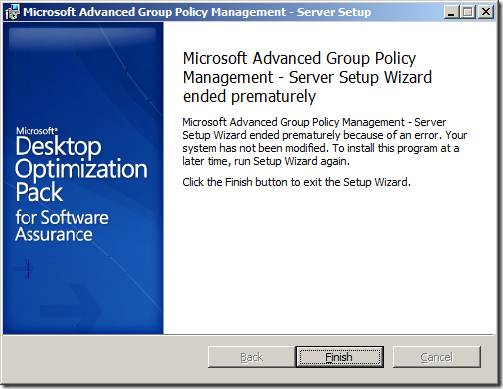
 Step 12. Click Finish
Â
NEXT > How to configure the AGPM client via Group Policy to automatically connect to the AGPM server
This post is part of a series of posts about Advanced Group Policy Management. If you want to see the other post in this series you can use the links below:
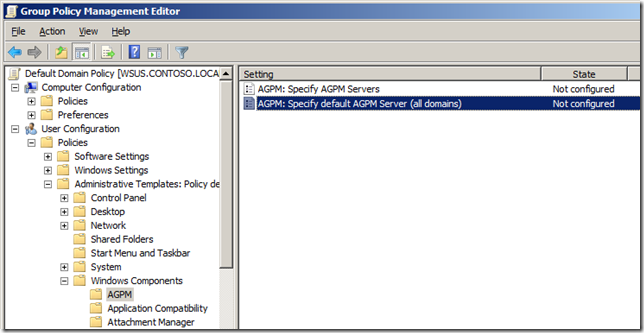
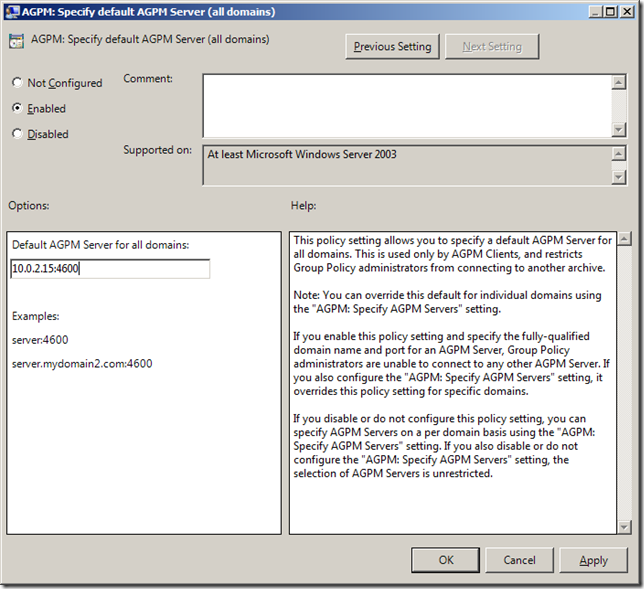
This section describes the process of how to automatically connect AGPM client to the AGPM server you have in your forest. If you do not perform this option step then each person that uses the AGPM will need to manually configure the Client to the correct AGPM server.
Step 1. Edit the Default Domain Policy using the Group Policy Management Editor (GPME) and navigate to Users Configuration > Policies > Administrative Templates > Windows Components > AGPM then edit the AGPM: Specify default AGPM Server (all domains)
Â
Step 2. Tick Enable and then type the name/IP address then :Port number of the AGPM Server in the text field then click OK
(Hopefully this is the last non-managed GPO change you ever make again)
This post is part of a series of posts about Advanced Group Policy Management. If you want to see the other post in this series you can use the links below:
This section show you how to delegate permission to a user to either review or edit group policy object via AGPM.
Step 1. Open GPMC on a computer that you have installed the AGPM client on.
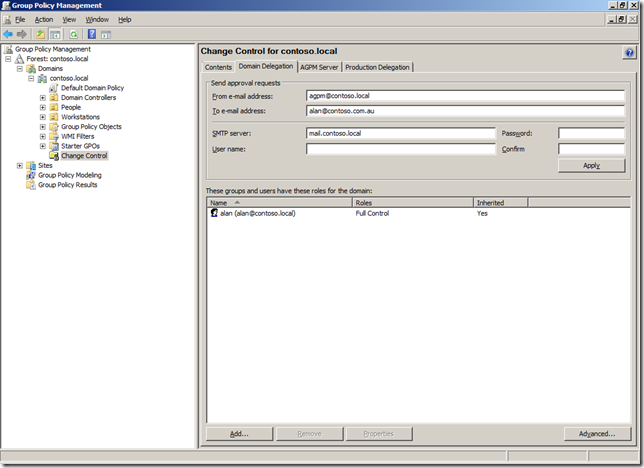
Step 2. Navigate and click on Change Control option and then the Domain Delegation tab then click Add
Â
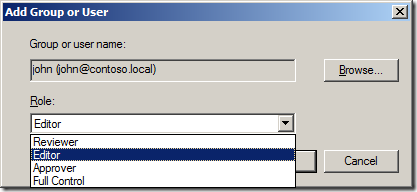
Step 3. Select the user John and then select the Editor from the role field then click OK
Â
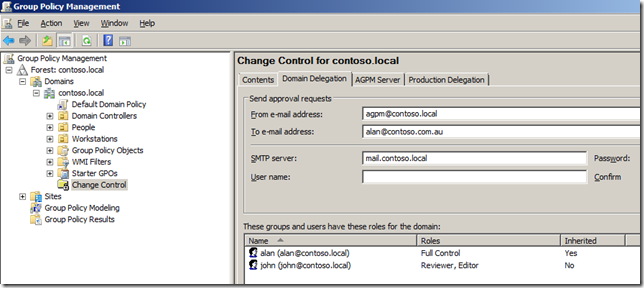
John now has Reviewer/Edit access to AGPM (that was easy!).
NEXT > How to create make changes to Group Policy Objects in AGPM
This post is part of a series of posts about Advanced Group Policy Management. If you want to see the other post in this series you can use the links below:
Now you are going to logon as John and create a fresh new Controlled GPO to have it then approved by Alan.
Step 1. Logon as John to a computer that has GPMC and the AGPM client
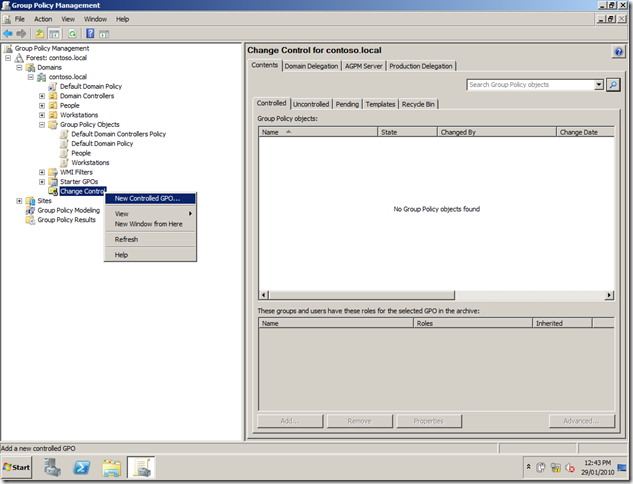
Step 2. Open GPMC and right click on Change Control and then click on New Controlled GPOâ¦
Â
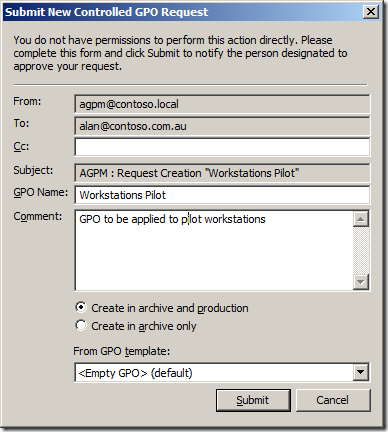
Step 3. Fill in the submission field so that an email will be sent to the AGPM administrator to review the New Controlled GPO Request then click Submit
Â
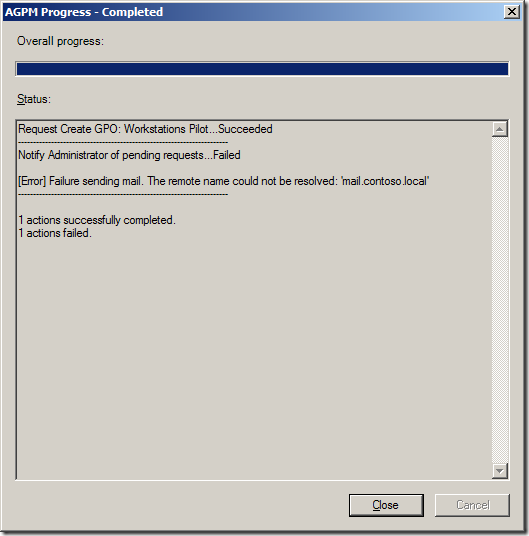
Step 4. Click Close
Â
Note: In this example I donât have a mail serve configured so the sending the of the email failed.
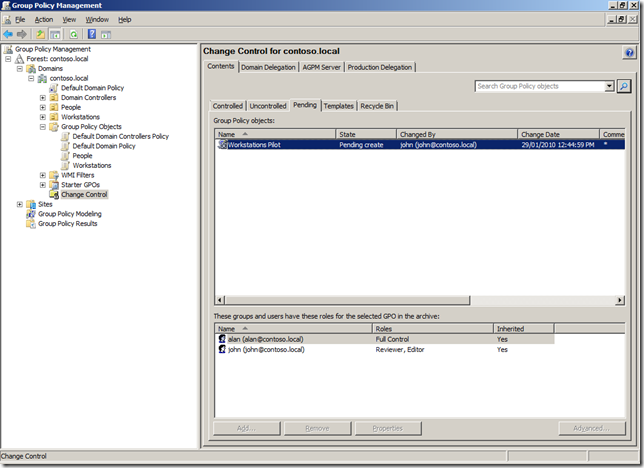
Step 5. Click on the Pending Tab. You can now see the Pending request waiting for approval.
Now we will approve the New Controlled GPO request.
Step 6. Logon as Alan to a computer that has GPMC and the AGPM client
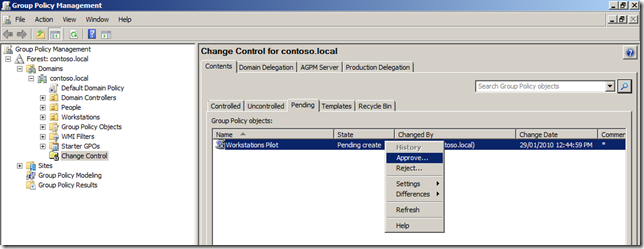
Step 7. Open GPMC and right click on Change Control then click on the Pending tab and the right click on the pending request and click on Approveâ¦
Â
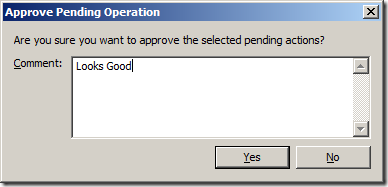
Step 8. Add a comment before you confirm the Approval action then click Yes
Â
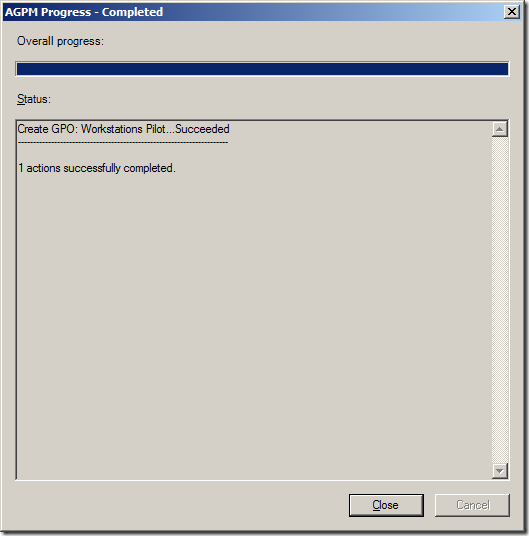
Step 9. Wait for it to Approve and then click Close
Â
Note: It is this stage that Alan can link the GPO manually to the Organisational Unit (OU).
NEXT > How to makes changes to existing uncontrolled GPOâs in AGPM
This post is part of a series of posts about Advanced Group Policy Management. If you want to see the other post in this series you can use the links below:
If you are deploying AGPM into an existing environment (and you probably are) then you will probably want to editing you existing GPOâs. Any GPO that is not managed by AGPM is called an âUncontrolledâ GPO and as such will not be touched until it is specifically made into a âControlledâ policy.
Step 1. Logon as Alan to a computer that has GPMC and the AGPM client
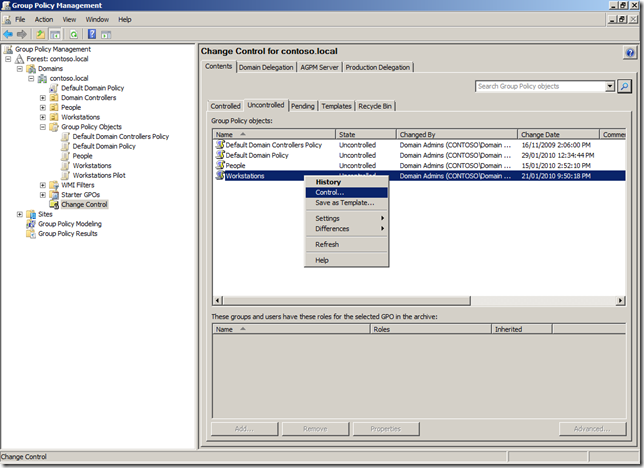
Step 2. Open GPMC and click on Change Control and then then Uncontrolled tab then right click on the GPO you want to âControlâ and then click on Controlâ¦
Â
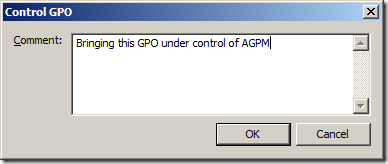
 Step 3. Add a comment to the GPO as its initial comment then click OK
Â
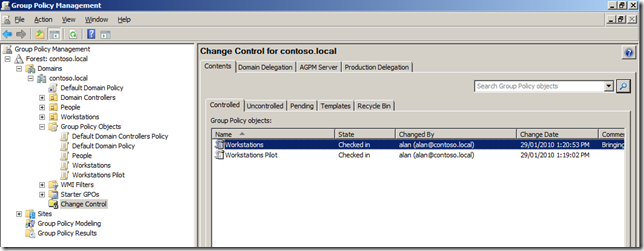
This Group Policy is now âcontrolledâ
Â
Hopefully this has series given you enough of an introduction to AGPM to get it installed and start to perform basic changes and approvals to GPO setting â¦
If you want more information on Advanced Group Policy Management then here is a list of link to pages I have found useful:
Microsoft MDOP Blog
TechNet: Overview of Advanced Group Policy Management
TechNet: A Video tour of Advanced Group Policy Management
TechNet: Technical Overview of AGPM
TechNet: What's New in AGPM
TechNet: Choosing Which Version of AGPM to Install
TechNet: Step-by-Step Guide for Microsoft Advanced Group Policy Management 4.0
TechNet: Operation Guide for Microsoft Advanced Group Policy Management 4.0
Group Policy Blog: Importing and Exporting with AGPM
I have been doing Active Directory and Group Policy work for a while now and I have developed my own set of rules that I try to use where ever possible. So below I have written down all my rules in no particular order for you to go over and use for yourself. You may only chose to use only some of these rules or you might want to use them all depending on your circumstance. This is a two part series where I will first talk about designing you Active Directory Organisation Unit structure and then in part 2 (Best Practice: Group Policy Design Guidelines â Part 2) I will discuss some more ideas for applying Group Policy to the OU structure.
I want to be clear that these are only guidelines and not rules that need to be strictly adhered to. In almost all case there are exceptions to these guidelines and you might even find your self implementing them in a hybrid approach. I intend for this web page to be updated on a regular basis as none of these rules are set in stone and thing obviously change all the time.
Before you begin the process of designing your Group Policy (and AD) structure you should first try to fully understand the requirements of the environment. Below are some points that I recommend that you find out before you begin:
When naming your Organisational Unit make sure the name you are using are short and to the point. There is technically nothing wrong with having long OU names but it is a pain to document and just leave you open to more chance of references then name wrong as their are more characters to type.
Bad Example |
Good Example |
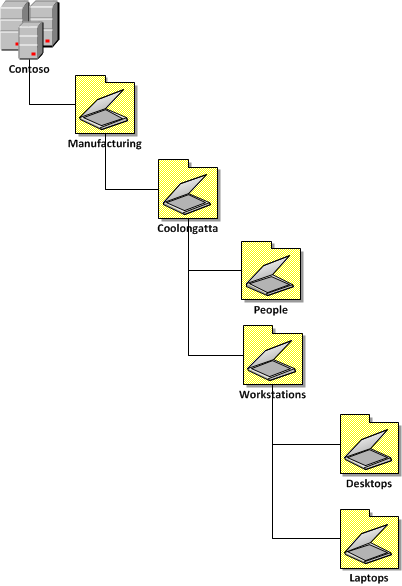
Naming OU to something that is intuitive is good for new starters in the organisation. If you name a OU âOOGâ a new starter in your organisation might not realise that this is the three letter international designation for Coolangatta AirPort which is the same suburb where your office is located. I know this is in conflict with rule 1 however it is also a balancing act your will have to carefully tread.
Bad Example | Good Example |
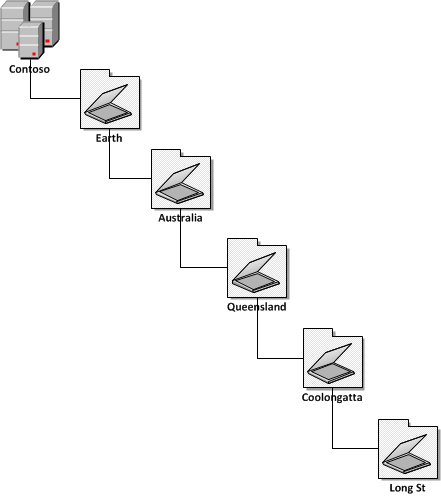
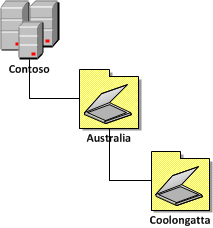
OU structures in AD are hierarchical therefore you need make your design fit to this structure. When deciding how your want to organise your OU structure you are probably going decide to make it either organisational or geographical. This is most important when you are going to a Geographical design as it is a physical impossibility to have one location located in two difference cities,states,countries or regions.
Bad Example | Good Example |
As a general rule you should only start creating another OU level if you are actually going to do something to that OU (e.g. delegate security or apply a group policy). Donât be tempted to create an elaborate structure to organise you AD object if there is not reason to do so. Having a deep OU structure also makes it very difficult to delegate security in the same delegating security on multiple folders deep to folder on a file share.
Bad Example | Good Example |
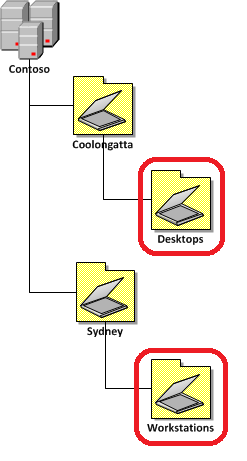
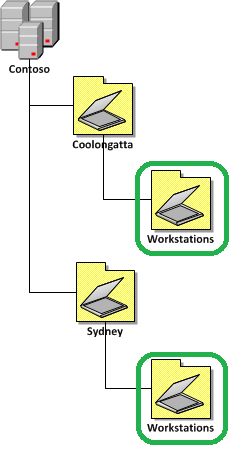
Donât mix your terms when naming our OU Structure as this leads to confusion if for IT admins that leads them to believe that something might be different about the two OUâs where they actually contain the same type of objects. The example below shows how two different sites calls the OU for the computer in the organisation Workstations and Desktops.
Bad Example | Good Example |
While it would be nice to have an OU called Computers and/or Users at the top level of your AD structure remember these are already container names and therefore cannot be used at the top level.
When a new user and or computer is created in Active Directory then by default they are created in the âUsersâ and âComputersâ container. As a result these objects are not subject to any group policy except for the Default Domain Policy or any GPO that are linked to the domain (see Part 2). Therefore you may want to consider redirecting where the default location for creating these new AD objects to a location that will allow you to easily apply GPOâs specific for new users and computers. Before you do this however you will need to create a OU that you can designate as the default creation location. Consider creating a top level OU called âNewâ or âDefaultâ and then create a Sub-OU called Users and Computers.
You may have picked up that I have called the Sub-OUâs Computers and Users which is in conflict with âBe Consistentâ section above. However in this case we are not creating a default location for just workstations and just people we are creating a location for all new computers (workstations or servers) and user accounts (service accounts, people accounts or resource accounts). This naming convention is also consistent with the names of the default containers in the top of the AD so there is some logic with keeping the name.
See âApply GPO to New Users and Computersâ Part 2 where I will show you how to apply the Group Policy to these new default OU âs.
For more information on how to redirect the default Users and Computers Containers see KB324949 Redirecting the users and computers containers in Active Directory domains
Designing an OU Structure that Supports Group Policy
â¦change the default location where new user and computer accounts are created so you can more easily scope GPOs directly to newly created user and computer objects
When designing your OU structure you need to keep in mind that companies do often change in size and often acquire or sell off divisions. Below I go thought the basic designs and then I show you how they can be combined into hybrid structures. For most organisation you will probably use hybrid of the various method that best suit your requirements.
Below I have listed some of the consideration for choosing an OU structure design (in no particular order):
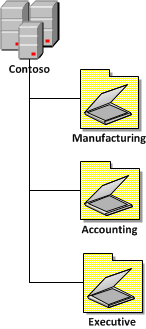
This method of organising your OU structure should be used if your have very clear and stable organisational boundaries. You are highly unlikely to use this type of structure by itself as this would have you lump all your users, groups, contacts and computer objects together in the same OU.
Organisational |
This method would be used where your company has many physical locations that perhaps have multiple divisions/departments in the same location. This would also be used if you did not have much variance between the configuration of computers in each physical location.
Geographical |
Designing an OU Structure that Supports Group Policy
you might consider geographically based OUs either as children or parents of the other OUs, and then duplicate the structure for each location
When you are placing you AD objects in you OU structure it is very good idea to not lump your object types together in the same OU an in a few cases you might also want to consider splitting you resources up as separate sub-resource types. Having your resources separate greatly simplifies the permission you delegate to your specific types of AD objects and also allows you to more easily apply group policy objects to your computers and users accounts.
In most circumstances it is likely that the Resource OUâs are and the lower end of the OU structure and are the OU that directly contain the AD objects (users,groups,contacts & computers)
Below is a list of example resource OUâs and how you can break them down.
Colour | Type of object it contains |
Yellow | Organisational Unit â No objects except for other OUâs are direct members |
Red | User Objects |
Blue | Computer Objects |
Green | Group Objects |
Purple | Contact Objects |
Resource Structure Example |
TechNet: Designing Your Group Policy Model
Classify the types of computers and the roles or job function of users in your organization, group them into OUs, create GPOs to configure the environment for each as needed, and then link the GPOs to those OUs.
Designing an OU Structure that Supports Group Policy
Think primarily about the objects you want to manage when you approach the design of an OU structure. You might want to create a structure that has OUs organized by workstations, servers, and users near the top level
By using a structure in which OUs contain homogeneous objects, such as either user or computer objects but not both, you can easily disable those sections of a GPO that do not apply to a particular type of object.
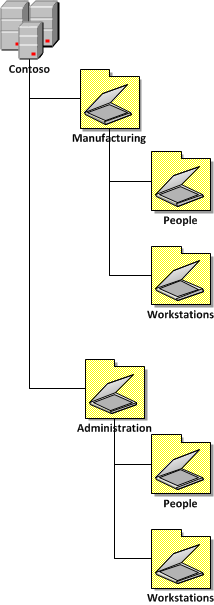
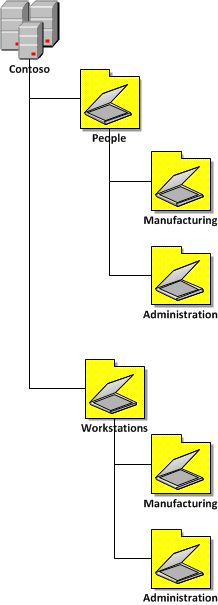
In this example we see what happens when we combine the two Resource and Location OU structure designs. The decision to make it a Location/Resource or Resource/Location structure would be heavily based on how you configured your computers and users. If you configuration your users fairly consistently across the organisation and there is not much variation in how you configured you computers then you may want to consider a Resource/Location structure. Inversely if you make a lot custom configuration changes based on the location of the user and computer then you should consider using a Location/Resource structure.
Two Level Hybrid (Location / Resource) | Two Level Hybrid (Resource / Location) |
This is similar to this example we saw above (Location / Resource) where we see what happens when we combine both Organisational and Location OU structure designs. The decision to make it a Organisational/Resource or Organisational/Location structure would be heavily based on wither how you configure your computers and users and the chance that you may divest or acquirer other businesses. If you consider there is a high chance of your company selling off or buying a certain department then you should consider using the Two Level Hybrid (Organisation / Resources) model. However if you are physically based in one location then and you think you will mainly apply configuration to all your users and computer consistently and only configured a small number of setting based on the organisation then you may want to consider the Two Level Hybrid (Resources / Organisational) model.
Two Level Hybrid (Organisation / Resource) | Two Level Hybrid (Resource / Organisational) |
The example below is called a Three Level Hybrid (Organisational / Location / Resource) model that would be used for most likely used for large organisation that have many sites and departments all of which have different configuration requirements. It is unlikely that you will want to use this three layer model of design unless you are a very large company with many divisions, locations.
Three Level Hybrid (Organisation / Location / Resource ) | Three Level Hybrid (Organisation / Location / Resource) |
This is the most complicated OU model you can deploy in your organisation. The below example shows a Organisational / Location / Resource for the users accounts however it has a two level Resource / Location model for the computers. You may want to have the Organisational / Location / Resource for the user accounts because they have very specific configuration requirements for the organisation. This example also has âDistribution Listsâ group OU under the Organisational OU which is absent on the other examples but is shown here to demonstrate that there could be other non-users & non-computer at this bottom level. This would necessitate keeping the bottom third level OU to separate the resource of different types.
The other difference in this example is having the Resource / Workstation as a separate structure. This could be required if you have outsourced the maintenance of these computers to a third-party and you want to easily delegate administration access. This would also allow for the granular delegation to the third-party site based IT support staff without them having access to computers not in their local site.
Mixed-Hybrid |
If you are an organisation of any significant size you probably have a delegated cretin duties to specific teams (e.g. help desk or desktop support) via the way of administrator groups. This would allow you to easily grant the required permission for a IT support person to a specific user by only adding them to one group. However one of the permissions that is normally delegated is the ability to change group membership.
If all the groups in your organisation were in one location then a person who simply has the ability to add and remove member from group could in theory given them self more administrator access by adding them self to a higher level administrators group. To prevent this from happening you should segment all administrator or higher level permission group in the AD structure so that only the most trusted administrators can make changes to these admin groups.
Also remember there is a difference from having administrator or delegated access to the Active Directory object and local administrator access to a computer. Therefore under each Workstations and Servers resources OU you may also want to consider creating an Administrators OU that contains the local administrator security group of the computers accounts in the top level OUâs. This would also assist and being able to easily delegate administrator access to both the computers AD object but also local administration as they are all contained in the one location in AD.
Another reason to you have a dedicated Administrators OU at the top level is so that your administrator accounts are not subject to the same SOE Group Policy setting than the rest of your users. Administrator accounts should also be a separate accounts for IT administrators as their normal day to day accounts should be subject to the same configuration as the rest of the staff. While this is something that a lot of IT staff loath I think it is very good idea for IT staff to set the example as to how computers are configured and dogfood their own configuration. Ensuring that IT staff also have a separate administrator account also reduces greatly reduces the security risk associated with doing day to day operations (checking email, surfing web) with administrator permissions (see How to use Group Policy to make Windows 7 90% more secure).
For more information on assigning local administrator access to computers via group policy check out my other article How to use Group Policy Preferences to Secure Local Administrator Groups
Isolated Administrator OU Structure |
TechNet: Using Security Filtering to Apply GPOs to Selected Groups
Create a separate OU for administrators and keep this OU out of the hierarchy to which you apply most of your management. In this way administrators do not receive most of the settings that that you provide for managed users.
Have administrators use separate administrative accounts for use only when they perform administrative tasks. When not performing administrative tasks, they would still be managed.
Below is an example of a combined Organisational / Location / Resources / Sub Resource model that you could consider for 4 level deep this structure or a variation of these levels should pretty much handle most any requirements of any organisation. As you can see from my examples below you would be fairly pushed to require an OU structure more than 4 level deep so ask yourself this question if you start to contemplate a 5+ level structure.
4 Level OU Structure |
Ok. So your brain is probably about to explode with all the different OU types and you just donât know where to start. Well in the TechNet article Designing an OU Structure that Supports Group Policy we see a really good OU structure in Figure 2.3 Example OU Structure (see image below). You should be able to see how this is an three level OU structure combining Location/Resource/Sub-Recourse and that the naming convention of the structure match closely with guidelines we discussed above. You may find that this example will fit all your needs exactly or you may end up customising the design over time but either way this is a pretty good design that I have seen work in may organisations.
I hope the above AD design ideas have helped you design your organisations OU structure. Certainly there is no one size fits all model and you need to carefully consider your requirements before committing to a design.
Now I recommend that you you should visit the second part in this series where I list my Group Policy design rules which heavily depend upon. This should hopefully show you how designing a good OU structure can help you substantially make administering Group Policy (and your entire AD) a lot more easier.
NEXT > Best Practice: Group Policy Design Guidelines â Part 2
In my previous article In this article Best Practice:Active Directory Structure Guidelines â Part 1 I spoke about some of the guidelines I personally use when developing an Active Directory OU structure. In this next part I will discuss some guidelines I use when designing a Group Policy Object infrastructure.
Ideally you should make the the Active Directory OU and GPO design decision together to best ensure that you have the most efficient design possible. However if you have an existing OU structure designed a lot of these guidelines can still be applied to most existing environments.
As in Part 1 these are simply guidelines that I use and should not be taken as hard an fast rules. I quite often finding myself having to break these rules due to real world conflicts or just because one rule might conflict with the other rule. If you do find your self in a situation where you are not sure which path to take try to chose the option that will result in the least administrative effort in the long term.
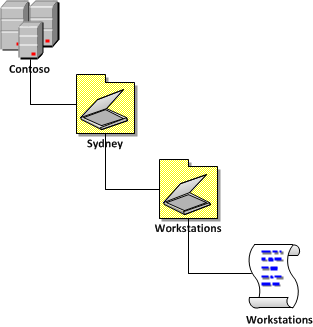
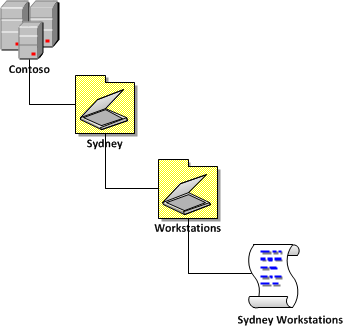
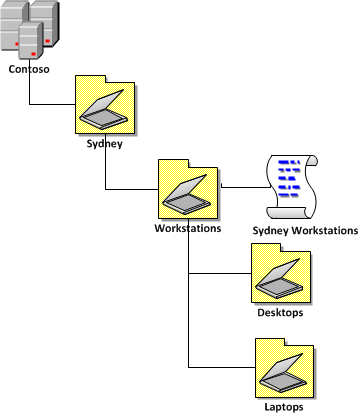
When naming the GPO try to keep the name of the policy the same as the concatenated name of all the OUâs to where the group policy object is applied. Having the fully concatenated name will make it intently know what that policy is applied when just looking at the GPO name. This is very handy to know when looking at a Group Policy Results report which only gives you the name of the GPO without the linked OU details.
Bad Example âWorkstationsâ | Good Example âSydney Workstationsâ |
In keeping with having names consistent this also means you should adhere to the same naming conventions as mentioned in Part 1 with the OUâs (i.e. âKeep it shortâ, âBe Intuitiveâ & âMost to least signification from left to rightâ⦠So in saying that please read the next guidelineâ¦
TechNet: Establishing Group Policy Operational Guidelines
Define a meaningful naming convention for GPOs that clearly identifies the purpose of each GPO
Nothing annoys me more to see a group policy called âWorkstations Policyâ or âWorkstation GPOââ¦. I KNOW ITS A POLICY!!!! I AM LOOKING AT IT IN THE GROUP POLICY MANAGEMENT CONSOLE. Please drop the work âpolicyâ or âGPOâ from the name of the Group Policy object as you are simple adding more characters to what might already be a long name only for the sake of pointing out the obvious.
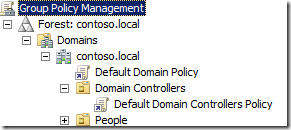
I also realise that the two GPOâs that come with AD are called âDefault Domain Policyâ and âDefault Domain Controller Policyâ which goes against this ruleâ¦
Remember at the start of part 1 how rules were meant to be broken⦠So I do NOT recommend that you rename these polices there is just to much risk and confusion that doing this might cause. But this would have to be the only exception to this rule that I would be happy to let thoughâ¦
Terminal Servers (now known as Remote Desktop Services) are essentially a multi-user workstation and as such should be treated more as a workstation than a server. Ideally you should configure you Terminal Server to be as close as possible as your workstations to provide your users with a consistent experience. The best way to make sure the configuration is consistent is to apply the same policy settings to the Terminal Serves as your workstations.
That being said donât apply the same computer Group Policy Object to the Terminal Servers if for no other reason than it helps reduce the risk of making a change to a workstation that could affect the stability of the servers (e.g. Automatic Update reboot schedule). Therefore you will need to maintain some level of manually synchronisation between you default workstation and terminal server policy.
Unlike computer GPOâs it far more acceptable to apply the same user GPOâs to your users when logging on to the Terminal Server as the GPO are applied to the User Object rather than the computer account. Using the same policy means that any changes made to the user policies will automatically apply to terminal servers without the administrative overhead of making duplicate updates when there are policy changes. If you have any user configuration that you want to configure that is specific to the terminal servers (e.g. disable adding PST file) then you can override this policy using the Group Policy Loopback option on the computer GPO you apply to the Terminal Server. This is another reason why you would want to have a separate computer GPO as it allow you to apply specific Terminal Server user settings via a loopback policy.
For more information on troubleshooting Loop back policies check out Loopback Policy Processing Debug Series | CB5 Blog and Aaron Parker's StealthPuppy blog.
TechNet: Using Loopback Processing to Configure User Settings
The User Group Policyloopback processing mode policy setting is an advanced option that is intended to keep the configuration of the computer the same regardless of who logs on. This option is appropriate in certain closely managed environments, such as servers, terminal servers, classrooms, public kiosks, and reception areas.
I have seen some organisations apply many Group Policy Objects (GPOâs) to the same OU. There are a number of reason why you might want to do this however you should really consider why you want spawn another GPO as each one will add about 5mb to you Active Directory SYSVOL. But if you start creating lots of GPO objects then you can quickly blow out your the size and performance of your SYSVOL. This is not such a problem if you have upgraded to a DFS-R SYSVOL replication or you have configured a Group Policy Central Store for your Windows Vista and later computers but its still good practice to keep the number of GPOâs as low as possible.
Now that I have just told you that you should load up your GPOâs with lots of setting rather than having lots and lots of separate GPOâs Mike Kline has referred me to the this great article Best Practice for Optimizing Group Policy Performance by Darren Mar-Elia that talks about Monolithic vs. Functional GPOs.
The terms "monolithic" and "functional" refer to how you design them. Monolithic GPOs contain settings from many different areas. For example, a monolithic GPO might contain settings from Administrative Templates, Internet Explorer Maintenance, and Software Installation policiesâall within a single GPO. By contrast, functional GPOs typically do one thing. For example, a functional GPO may do only Software Installation or enforce Security settings.
I totally agree with this and my advice to you when trying to decide which to use that your should pick the type of policy configuration that suites your needs.
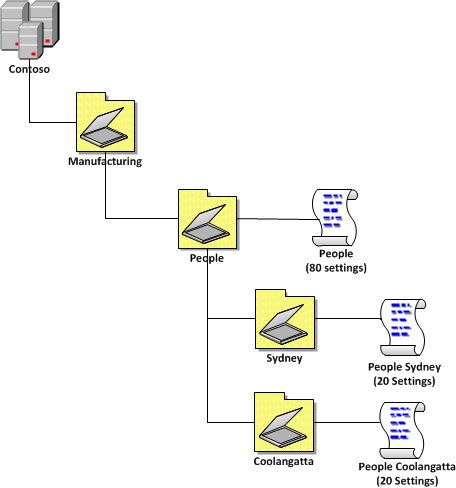
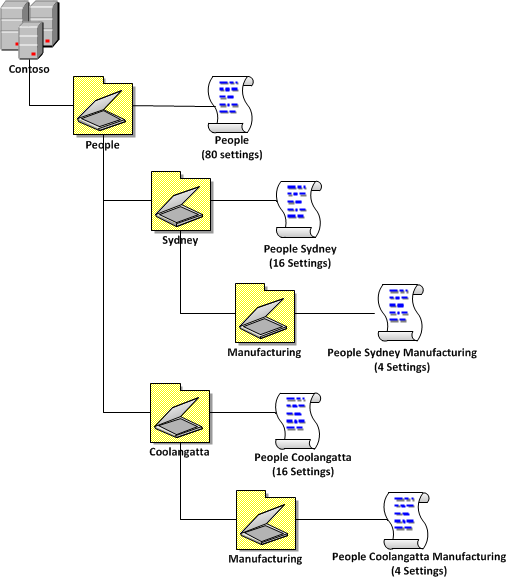
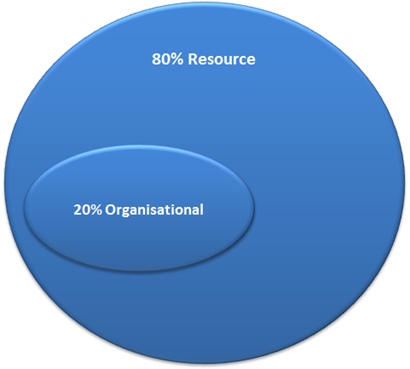
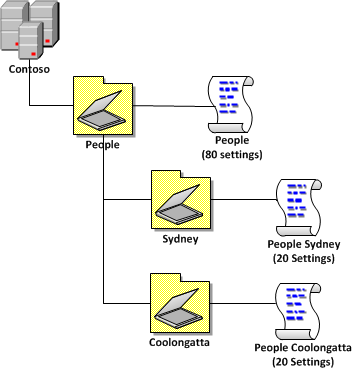
This also maps very nicely to the 80/20 examples you will see below where you take a more Monolithic approach to the 80% GPOâs and more Functional to the 20%. The 80% policies are going to have more setting in them but they will be relatively static where the 20% policies will have fewer settings but probably need to be updated more frequently. This way you should be able to balance the proâs and conâs of each policy type in your environment.
TechNet: Complying with Service Level Agreements
If you have large or complex GPOs that require frequent changes, consider creating a new GPO that contains only the sections that you update regularly.
It is often a misconception that splitting up your group policy setting into a lot of Group Policy Objects (GPOâs) will slow down Group Policy on your computers. While this might be true if you have many 100âs (or thousands) of GPOâs applied to your computer this is not normally the reason why computer may slow down processing Group Policies. Normally you will find that its the number of settings you have applied that will cause performance issues and even then you will find that particular setting that will cause more of a performance hit than other. In my experience the policy setting that cause the most likely affect performance are:
You should also expect that the first time a users logs on with a new account that they should expect a slow logon as the computer will need to apply all policy setting. However subsequent logonâs should be much faster as the computer is then only checking the policy is still applied. This is similar to the difference between running a âGPUPDATEâ and a âGPUPDATE /FORCEâ .
You should also check out the Best Practice for Optimizing Group Policy Performance post by Darren Mar-Elia as this post explains in detail how GPO are applied and what you can do to tweak performance.
While it would be fairly rare to have an environment that has more than a 999 GPOâs applied to a single computer still be aware there is a hard limit on the number of GPOâs you can apply to any user or computer. Thus trying to keep the number GPOâs to a as few as possible is a good idea especially in very large organisations that may uses separate GPOâs for installing software packages.
TechNet: Determining the Number of Group Policy Objects
Note that a maximum of 999 GPOs is supported for processing GPOs on any one user or computer. If you exceed the maximum, no GPOs will be processed.
If you are creating a GPO that is only meant to be applied to computers (and vice versa for users) then you should disable the unused portion of the GPO. This not only helps guards against accidental change to the section of the GPO that should not be applied it should also give you a small performance boost processing policies on your computers as the GPO does not un-necessarily evaluate parts of the policy that are not configured with any settings.
While I have never seen a performance benefit in disabling the unused portion of a GPO or based on the number of GPOâs applied to a computers (see âSettings (not polices) = Slower SOE)â section above) I do encourage that you adhere to these principals to avoid Death of a thousand cuts when it comes to the performance of your systems.
TechNet: Complying with Service Level Agreements
If a GPO contains only computer or user settings, disable the portion of the policy that does not apply. The destination computer does not scan the portions of a GPO that you disable, which reduces processing time
In all my time as an Group Policy Administrator I cannot real once a scenario that I required the use of the Enforced feature of Group Policy. At all cost you should avoid this setting as doing so is like using big hammer to a problem that you can probably avoid if designed right.
(RESIST THE URGE)
TechNet: Designing Your Group Policy Model
Use the Enforced and Block Policy Inheritance features sparingly. Routine use of these features can make it difficult to troubleshoot policy because it is not immediately clear to administrators of other GPOs why certain settings do or do not apply
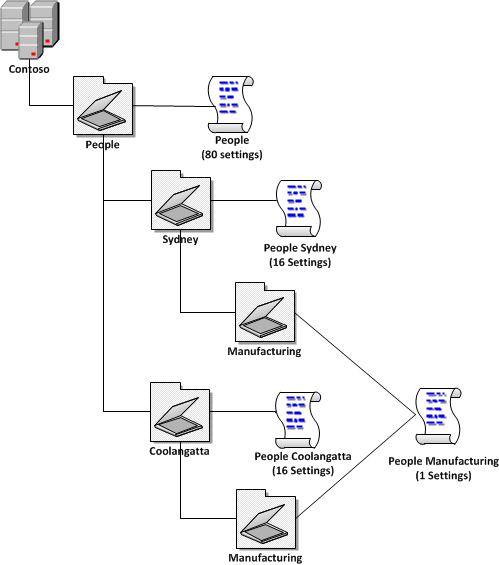
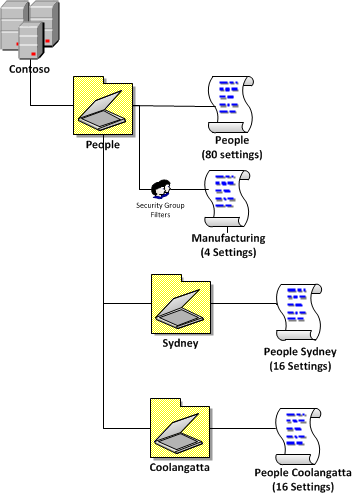
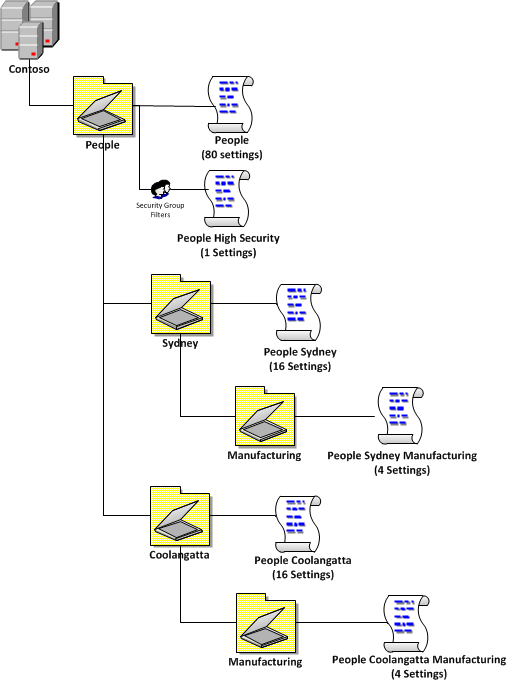
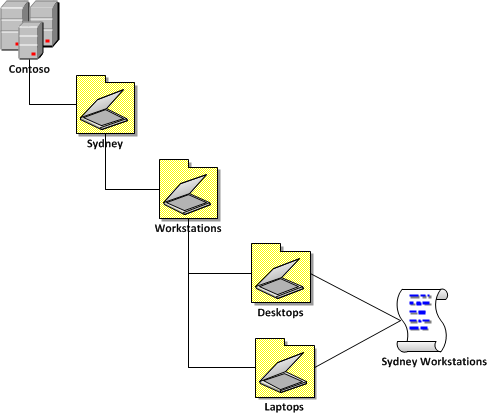
If you are in a situation that you want have the same settings you want to apply to all the users or computers in specific OUâs your organisation then consider linking the same GPO to these OUâs. When naming the GPO chose a name that represents what is common to what you are applying. This is shown in the image below (and in â80/16/4 Example 2â) where the policy is named âPeople Manufacturingâ as this is the common two values to where to policy is being applied.
The means the âSydneyâ and âCoolangattaâ is ignored as that would result in a long policy name of âPeople Sydney and Coolangatta" Manufacturingâ. It would be obviously longer again if you had the policy linked to many more sites.
Advanced Group Policy Management (a.k.a. AGPM) is a tool that is available to anyone who is licensed to have Software Assurance. This programs is a change management tool that allows you to check-in and check-out GPO as well as create a list of changes and an audit trail of change to GPOâs. You can check out my AGPM install and configuration series at AGPM Part 1: Introduction to Advanced Group Policy Management (a.k.a AGPM) v4. If you have a Group Policy infrastructure of any size or if you have more than one person who is responsible for making changes to GPOâs then this is definitely something you should consider.
AGPM is also very good at avoiding GPO editing conflicts as you will find that the âlast writer will winâ when making policy changes. This means that in an environment that has multiple GPO admins you might find that you could be overwriting each other changes with un-expected results. AGPM gets around this issues as it support the method of checking in and out GPOâs for editing meaning that now two GPO administrators can edit a GPO at the same time thus eliminating the possibility of overwriting each other changes.
For even more information on AGPM check out the following links:
Microsoft MDOP Blog
TechNet: Overview of Advanced Group Policy Management
TechNet: A Video tour of Advanced Group Policy Management
TechNet: Technical Overview of AGPM
TechNet: Whatâs New in AGPM
TechNet: Choosing Which Version of AGPM to Install
TechNet: Step-by-Step Guide for Microsoft Advanced Group Policy Management 4.0
TechNet: Operation Guide for Microsoft Advanced Group Policy Management 4.0
Group Policy Blog: Importing and Exporting with AGPM
Implement something like AGPM is an excellent way to make sure you have a proper rollback strategy for making changes to Group Policy but sometimes you just want somewhere to test the policy functionality before you put it into production. I would definitely recommend having an isolated replica of the AD structure in for making test however the problem with these environment is that they are normally not a 100% representation of the production environment.
Therefore as a second step in your testing of policy changes before being applied to productions systems you should create a test GP structure that will allow have a selection of users and computers that are in production but are not mission critical. Best to select users that you know are easy to get along with and wont scream to loud when you break something. You can even apply your own computer and users account to this test GP structure but make sure that this is not your only account as you want your computer to still be able to work so you can undo your changes in case you royally stuff something up.
The image below shows how you could implement a Test OU/GP structure however by creating a separate OU structure to test your group policy. This method provides excellent isolation of your test computers and users to production which may be desired if you want to lessen the impact of any bad configuration changes. However this would mean that you would have the overhead of needing to ensure that all configuration changes to the production GPOâs are also replicated to these. Otherwise you may end up with your test environment being configured differently to your production GPO.
The Security Group Filtered method applies the test GPOâs to the existing OU structure but they are security filtered so they will only apply to the users or computers you want to test. The test GPO will only have the delta configuration changes applied to it for the policy setting that you are testing therefore all other production policies will be implicitly applied to the test objects. Therefore you test computers and users are as close as possible representation of production because they are subject to the production policies. This also mean you do not need to make duplication configuration changes to the GPOâs when you do make production changes as the test computers will automatically have the production policies applied. The down side to this method is that unless you are carful in how you apply your security filtering you may inadvertently apply the test changes to your computers users and computers as they are all under the same scope of the test GPO. Another disadvantage of this method is that as you are relying upon security groups to apply the users or computer to the test policy it is possible that you could be a member of multiple test groups and thus be subject to multiple conflicting test GPOâs which may make the results somewhat unpredictable.
When not testing GPO changes the Test GPOâs should remain configured without any settings and/or the link to the OU should be disable to avoided any extra policy processing overhead to the production users and computers.
This method combines both a separate OU structure and separate GPOâs but avoids having to use security group filtering. The advantage of this method is that you test environment is still subject to the production GPOâs however the test policies are only applied to the users and computers that are located in the Test OU structure. This method totally mitigates accidently applying a test configuration to your production computers and it also eliminates the need to duplicate configuration changes to your production environment.
TechNet: Establishing Group Policy Operational Guidelines
Always stage Group Policy deployments using the following pre-deployment process
TechNet: Designing Your Group Policy Model
Prepare a staging environment to test your Group Policy-based management strategy before deploying GPOs into your production environment.
TechNet: Deploying Group Policy
Always fully test your GPOs in safe (nonproduction) environments prior to production deployment
Especially if you donât have something like AGPM installed in your environment you should seriously consider making a PowerShell script that simple backs up all your new GPOâs in your Active Directory every night. Having back up copies of you GPO is very handy especially if you have miss-configured something and you quickly want to rollback to last known good policy setting. For more information on how to do this with PowerShell visit PowerShell Script: Backup all GPOs that have been modified this month from the Group Policy Team Blog.
TechNet: Defining Group Policy Operational Procedures
You should also create regular backups of your GPOs
Unless you are changing the default domain password policy then it is strongly recommended that you do not modify the Default Domain or Default Domain Controller group policy objects as making a mistake in these two policies up can really mess up your Active Directory. If you want to make a change to all your DC or your entire domain then consider making a separate new group policy at the same level as the default policies. This will at least allow you to un-do any change selectively disabling the offending policies if something does go wrong.
If you need to modify some of the settings contained in the Default Domain Policy GPO, it is recommended that you create a new GPO for this purpose, link it to the domain, and set the Enforce option. In general, do not modify this or the Default Domain Controller Policy GPO. If you do, be sure to back up these and any other GPOs in your network by using GPMC to ensure you can restore them.
TechNet: Establishing Group Policy Operational Guidelines
Do not modify the default domain policy or default domain controller policy unless necessary. Instead, create a new GPO at the domain level and set it to override the default settings in the default policies.
I know it sounds strange for a Group Policy expert to say avoid using Group Policy but this is definite one case where you should consider using other software deployment products due to their vastly superior features.
Group Policy Software Installations (a.k.a. GPSI) is a way you can deploy an MSI based application to your computers using Group Policy. This can be very useful way of deploying a standard set of applications to your computers however when compared to the advanced targeting features of SCCM software deployment or App-V this limitations of this method of software deployment quickly becomes evident.
One common problem I see when deploying software this way is the âUn-install when falls out of scopeâ options. This can be very handy when you want to move a computer to another OU and you want all the software packages that are not needed any more to un-install. This is even worse when you try to move an computer between domains as the computer will then un-install and re-install all the applications assigned to it which can take a VERY LONG time. Even when you have the âUn-install when falls out of scopeâ not ticked on the source domain and you move the computer to a new domain you will find that the installer service will still need to do a repair/check install of all the applications of the new domain even if the applications are already installed. However this also means that when the computer is removed from a domain then you have to wait for all the applicationâs to un-install during the next reboot. The un-installing of application can obviously take a long time if you have many applications install via this method. If you donât select this options then you will find that your computer will over time build up the a number of installed applications installed on your computers that will affect performance, stability and licensing costs. The other inflexibility of doing software assignment to the computers via GPSI is that they will only install on the next reboot of the computer. Meaning that a user will need to do a full reboot of their computer before they will be able to start using the new applications.
The other restriction of GPSI is that you are limited to deploying only Microsoft Software Install (a.k.a. MSI) packages. Where tools like SCCM and App-V will allow you to deploy application via a silent command line option or via a sequenced application.
So due to all these targeting issues with GPSI software then I strongly recommend that you consider using either Microsoft SCCM package deployment or Microsoft App-V due to the superior targeting and features these products offer. For more information on the advantages of Microsoft App-V then i strongly recommend that you checkout the series of App-V FAQ at http://blog.stealthpuppy.com/tag/appvfaq .
Office 2007 Deployment via Group Policy
Office 2007 is no longer deployed using transform files
Below are the only scenarios that should be used when deploying Office 2007 via GPSI. While this article is specific to Office 2007 I would also say that the same limitations should be used when considering GPSI for other applications as well.
TechNet: Use Group Policy Software Installation to deploy the 2007 Office system
You can use the Software Installation extension of Group Policy to deploy the 2007 Office system to computers if the following conditions exist:
Small organizations that have already deployed and configured Active Directory
Organizations or departments that comprise a single geographic area
Organizations with consistent hardware and software configurations on both clients and servers
To often I see people editing their GPOâs directly from a Domain Controller in their organisation as they are not aware they can do this remotely. The Remote Server Admins Tools (a.k.a. RSAT) have will give you the option to install (See instructions here) the Group Policy Management Console on any workstation or server running Vista/2008 or greater. I strongly encourage you to do this as if you are performance day to day management of your active directory (e.g. Creating users, editing Group Policy and adding/removing users from groups) then sooner or later you will find that you might affect the stability of your DC (which would be BAD).
When given the choice of applying the same policy at multiple lower locations or just one locations higher always try to link the policy as high up as possible in the OU tree. If there are cases where you want to apply the policy setting at all levels except for a minority of the lower sub-OUâs then simple apply a different policy on the fewer OUâs to make the exception.
Bad Example | Good Example |
Essentially there are three ways ways you can link a GPO to an AD structure firstly is to apply it to a OU secondly is to apply it to an AD Site and finally is to link it to a domain.
I have to say that you should NEVER consider applying a Group Policy to an AD site EVER!!!. Not only does applying a GPO to an AD site make troubleshooting an absolute pain you frequently finding yourself inadvertently applying a user or workstation GPO to your servers (This can be VERY BAD). AD Sites are based on IP subnets and I agree it can be very handy to apply settings based on the IP address of the computer (see How to use Group Policy Preferences to dynamically map printers with Roaming Profiles ) and thankfully there is a way to now do this with Group Policy Preferences. Any of the new preference settings can be targeted using Preference Item-Level Targeting which gives you 27 different ways you can target your setting. The IP Address Range Targeting and Site Targeting target options will allow you to achieve the same targeting as applying the GPO to an AD Site however you are far less likely to make a mistake using this method as the GPO should be linked to resource OU that limits the scope of the policy to only a particular type of AD Objects (e.g. just workstations not servers).
Linking a GPO to an OU is by far and away the most popular method of linking a GPO. This method allows for easily change the users configuration my moving them into the appropriate OU structure to have them configured. This method also fits well with the resource OU structure (see Part 1) so that you can disable parts of the GPO that donât apply to the object that you are apply the policy.
Technically you can apply a GPO to the Domain however this is more or less like linking it to the Root Organisational Unit. Linking it here will apply the policy to the entire domain so make sure that you are very careful when link a policy to this location. Policies should only be linked to the domain if you have a setting that you want to be applied to all users and/or computer in your entire domain. (See âEdit Default Domain Policies Sparinglyâ section above). The other scenario that you might want to link a policy here is if you want to make sure that you have at least your core policy setting applied to your âUsersâ or âComputersâ container. But I would also recommend that you redirect these default locations for new objects so that you donât have to setup GPOâs at the domain to cover these objects.
If, however, the settings do not clearly correspond to computers in a single site, it is better to assign the GPO to the domain or OU structure rather than to the site.
Most GPOs are normally linked to the OU structure because this provides the most flexibility and manageability
There are two ways you can filter your GPO when you apply then to your AD structure. Predominantly I find that Security Filtered Group Policy Objects is the most common way you can filter. Either way you should be filtering a GPO only when you want to exclude or include exceptions to the scope of the policy.
This method allow you to apply Group Policy Objects to a cross section of users or computers in your organisation. I quite often have a security filtered policy that has my pilot users computers as members so that I can selectively apply settings to their computers first for testing (see âCreate a Test Group Policy Structureâ section above). As computers and users can also be a member of multiple GPO this also allows you to configure a users environment without having to spawn many number of levels of OUâs that would other wise be necessary for every combination of GPO assignment (see â80/16/4 Example 3 & 4â). You can in theory apply a single user or computer to a GPO by adding them explicitly to the GPO under Advanced security (see image below).
However this is extremely poor practice and I would strongly recommend that you should always create a security group that has the âApply Group Policyâ permission assigned to it so that at a later stage you can assign users or computer to the GPO without modify the permission on the GPO itself (see image below).
I know the name âWorkstation GPOâ might seem to conflicting with the âDonât use the work âPOLICYâ or âGPOâ in the GPO nameâ rule that however in this case âGPOâ is justified as this is the name of a security group and so it is not obvious that a the security group is used as part of a Group Policy Object.
Recommendation: When removing âAuthenticated Usersâ from the security filtering of a GPO ensure that you only remove the âApply Group Policyâ permission and not the âReadâ permission as this will cause âInaccessible GPOâ error when any non domain admin tries to look a the GPOâs via GPMC. See my previous post How to apply a Group Policy Object to individual users or computer for detail instructions on how to do this correctly.
TechNet: Defining the Scope of Application of Group Policy
If you have Read access to the domain, site, or OU, but not on one of the GPOs linked there, it will appear as Inaccessible GPO, and you will not be able to read the name or other information for that GPO
The exception to where you want to do this is if you have many GPOâs that are security filtered and you want to ensure as fast a possible security processing then removing the read permission will âslightlyâ improve performance. So unless GPO processing time is an issues this doing removing the read is still not recommended.
TechNet: Determining the Number of Group Policy Objects
If the Apply Group Policy permission is not set, but the Read permission is, the GPO is still inspected (although not applied) by any user or computer that is in the OU hierarchy where the GPO is linked. This inspection process increases logon time slightly.
Recommendation: You should only security filter GPO when the setting in the policy are mutually exclusive with all the other GPO in your organisation. If you have two GPOâs that are security filtered that configure the same setting and the user or computer are in both the group for that policy then only one policy will win out and you could end up with some fairly un-predictable results.
WMI Filters have been around since Windows XP/2003 and are a great way to filter your Group Policy Objects based on the hardware of the computer that the policy is applied. However performing a WMI queries can take a substantial amount of time and if you have multiple WMI filters applying to your computers you have a significant performance decrease. Once again you can get around having to resort to using WMI Filters as Group Policy Preference Item-Level Targeting also have a number of options you can target hardware. Unlike WMI the Preference targeting engine has the performance advantage of being written in native code so it is much faster at determining what setting to apply.
They hardware targeting options are:
So as you can see WMI Filters applied to the GPO object itself however just as in the âWhere to Linkâ section above you will see Group Policy Preference will help you avoided having to rely upon WMI to often.
WMI filters can take significant time to evaluate, so they can slow down logon and startup time.
When creating a GPO always consider creating a security group and assigning it the Deny âApply group policyâ permissions (see image below) so that you have a simply way to exclude a particular user or computer from the policy in the future. Having this deny group applied to the GPO in advanced can save you a lot of time as it is often much easier and quicker to added a users to a security group than it is to modify the security on a GPO.
(Same as above) I know the name âWorkstation GPO Denyâ might seem to conflicting with the âDonât use the work âPOLICYâ or âGPOâ in the GPO nameâ rule that however in this case âGPOâ is justified as this is the name of a security group and so it is not obvious that a the security group is used as part of a Group Policy Object.
In part 1 I recommended about setting up a new OU structure for any new user and computer that is created in your AD under the âRedirect New User and Computer Accountsâ section. The reason why this was recommended was to enable you to easily apply a GPO to the default locations for these objects without having to resort to modifying the Default Domain Policy or by linking a new GPO to the entire domain.
It the example below I have created a simple GPO for each Users and Computers OU. Using this method your default user and computers will still receive the âDefault Domain Policyâ GPO and any additions settings in the two âNewâ GPOâs.
I donât recommending linking the âPeopleâ or âWorkstationsâ GPOâs (See âExample Group Policy Designsâ section below) as the NewUsers and NewComputers OU as they could contain objects other than People and Workstations (e.g. Service Accounts or Servers). Instead I recommend that you only configured some basic security setting for the âNew Computersâ such as a default WSUS and patch install schedule so that any computers that are left in these OUâs are at least kept up to date with security patches. Then for the âNew Usersâ GPO you may want to configure a delayed logon script (see How to schedule a delayed start logon script with Group Policy) that notifies the users that they are not properly configured and they need to contact the help desk.
In any case even though you have configured these locations it is still very important that you establish some sort of regular process by which someone reviews the objects in these OUâs and ensures they are moved into the appropriate locations so the proper policies are applied.
Designing an OU Structure that Supports Group Policy
â¦change the default location where new user and computer accounts are created so you can more easily scope GPOs directly to newly created user and computer objects
Ok⦠this is the a rule in name only as it should also be considered as a guideline. Essentially you should try to put the vast majority of setting in a policy that applied to all your computer or users. Then you should apply the exception to the default policy to the subset only to the computers you want to apply these settings (see 80/20 Conceptual Design). If two scopes/levels of applying policies is not flexible for your organisation then you can even consider the 80/16/4 to give you more flexibility (4% equals 20% of 20%). Also note the smaller 4% scope does not necessarily need to be a complete subset of the 16% as it is possible that you want to apply location specific settings that have nothing to do with the organisational structure (see 80/16/4 Conceptual Design below).
When deciding what policy settings to put in the 80% of 20% GPOâs make sure that you take another look at the âMonolithic vs. Functional GPOsâ section above that talks about the different approaches you can take when configuration settings. As I said before the 80% policies are going lend them self to have more setting in them but they will probably be relatively static (i.e. Monolithic) where the 20% policies will have fewer settings but probably need to be updated more frequently (i.e. Functional).
80/20 Conceptual Design | 80/16/4 Conceptual Design |
The conceptual designs above shows that there is only one level 2 and level 3 scopes to apply GPO but in reality there could be many different lower level policies that can be applied to your environment as seen in â80/16/4 Example 4â.
The organisation below that I use in the examples conveniently has 100 setting that they need to apply. Therefore they number of setting equals the percentage break down of the number of settings that are applied. In real world the number of setting are obviously going to vary greatly from single digits perhaps many thousands of settings.
â80/20 Exampleâ is a simple representation of how you would actually apply this in the real world. As you can see 80 setting are applied at the top level to all âPeopleâ OU and there then there are 20 settings site specific user settings. These location setting are typically drive and printer mapping setting that are specific to the site. While the âPeopleâ Group Policy Object will have setting that need to be applied to all users universally (e.g. screensaver time out value.)
80/20 Example 1 |
â80/20 Example 2â is the same as Example 1 except in this scenario the business has decided to have a top level organisational OU structure so that it will be easy in the future to separate parts of the organisation from the AD in the future. This illustrates that you do not need to have the same number of levels of OUâs in your AD as the number of level of scope that you apply GPOâs.
80/20 Example 2 |
â80/16/4 Example 1â shows you how you would apply this to a âThree Tier OU Structureâ (see part 1). The advantage of this model is that all setting are applied base on the OU structure and which means all policies are applied simple based on the location of the AD object in the OU structure. This is useful as you don't that you donât need to add and users (or computers) to security group.
80/16/4 Example 1 |
â80/16/4 Example 2â shows you what you can do when you only want to apply the same âManufacturingâ setting to all the users across all the sites. This takes into consideration the âReuse GPOâs where possibleâ rule (see above) and link a single manufacturing GPO
80/16/4 Example 2 |
â80/16/4 Example 3â shows you how you could apply the policy differently using a single security group filtered policy at the top level but still have the same affect as the â80/16/4 Example 1â. This is an example of applying a 3 level GPO structure to a 2 level OU structure as the âManufacturingâ simple by applying it at the top level but then applying a security group filter. The advantage of doing it this way is that you donât need to have as many OU deep (see âGo Wide not Deepâ in part 1) and it avoids having to create a new Group Policy for the manufacturing users at each site (especially when they might be the same settings).
80/16/4 Example 3 |
â80/16/4 Example 4â shows a combination of â80/16/4 Example 1â and â80/16/4 Example 2â where the organisation has generally the same requirements of âExample 1â however they need to apply 1 high security setting (e.g. shorter screensaver timeout) that need to be applied to the managers computer because they normally deal with sensitive corporate information. This also illustrates that you can have multiple level 2 and level 3 GPO in the same environment and that level 3 GPO policies do not necessarily need to be a subset of level 2 policies (see conceptual circles above).
80/16/4 Example 4 |
I know I have just gone though above that you should apply 80% of your settings in the highest policy however there is one problem with this. If for some reason a computer or users is placed in a top level OU or a second level OU is created without a policy applied to it or a user or computer has not been added to the correct security group this could leave gaps with the coverage of settings. So to get around this issue be sure that your level one 80% policies are configured with a default setting to cover your more essential configurations such as Screensaver timeout or WSUS servers.
In the example below we have 95 settings (or 95%) of the setting being applied to the users with the 20% being applied at the second level policy. Effectively only 80 settings (or 80%) will be actually be applied to the users from the top level policy as there is a 15% overlap of settings the settings. However a user in the âPeopleâ or the miss configured âBrisbaneâ OU will at least get 95 setting (or 95%) of the settings applied. This might not be a perfect configuration for them however it will at least mean they are compliant to the mandatory corporate configuration settings (e.g. Screensaver on and WSUS server configured).
In closing I hope this documents has helped you design your Group Policy infrastructure in your environment. If you have any other questions you want covered or you simply have a question about what I talked about above please feel free to post a commentâ¦
Here is a list of link to other web sites that I have found useful in guiding my design decisions with group policy.
I plan for this to be a dynamic article that I will change over time and I am sure there will be a few errors along the way that will need correcting so below are the list of changes that I made to this article since it was originally published:
28/07/2010 â Add section for âMonolithic vs. Functional GPOsâ from http://technet.microsoft.com/en-us/magazine/2008.01.gpperf.aspx by Darren Mar-Elia via Mike Kline
28/07/2010 â Corrected error in the WMI Filter sections that said they had been around since Windows 2000 (Should have said XP/2003). Thanks to Aaron Parker
2/08/2010 â Added mention to âHow to Linkâ that you can link to the domain. Added more references to Microsoft TechNet articles. Added âCreate a Test OU Structureâ
3/08/2010 â Added âApply GPO to New Users and Computers OUâ section.